Welcome to Hannoch's Blog!
这里记录着我的学习之路-
JBoss 漏洞利用
前言
http://ip:8080/jmx-console/HtmlAdaptor?action=inspectMBean&name=jboss.system:type=ServerInfo由这样的url应发的血案。
介绍
JBoss Application Server 参考文献1 是一个基于Java EE的开源应用服务器。这类软件的一个重要区别是它不仅实现了在Java上运行的服务器,而且它实际上实现了Java的Java EE部分。因为它是基于Java的,所以JBoss应用程序服务器可以跨平台运行,可以在任何支持Java的操作系统上使用。JBoss是由JBoss开发的,现在是Red Hat的一个部门。

JBoss Web Server为组织提供了一个用于Java Server Pages(JSP)和Java Servlet技术,PHP和CGI 的单一部署平台。它采用了真正的高性能混合技术,该技术结合了最新的OS技术,可以处理大量数据,同时保留所有参考Java规范。
JBoss漏洞
JBoss现在被广泛使用,并且由许多组织在各自的Web服务器上部署。作为一个有用的应用程序,它一定是黑客和恶意用户的目标。
虽然在JBoss上发现了许多漏洞和漏洞,但已经发布了许多CVE。但是今天我们将看看JBoss应用程序中最关键的错误之一,它可以被网络犯罪分子广泛使用。
我们来看看默认的JBoss服务器

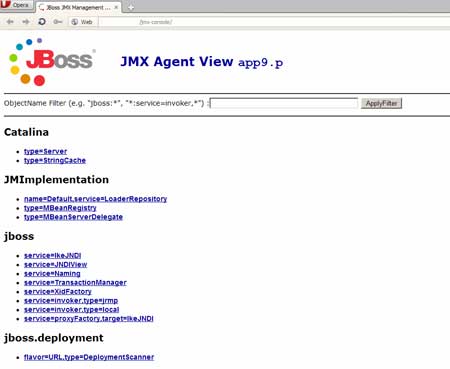
默认状态,如果配置不正确,可能会让攻击者造成破坏。由于JMX控制台 [ 参考2 ]可以通常在端口8080上远程访问,黑客和恶意用户可以使用JBoss控制台中的DeploymentScanner功能在服务器上部署WAR(Web存档)文件或shell。在下一节中,我们将了解实际的利用情况。
利用JBoss(一)
我们大多数人都会开始寻找 Metasploit,Nmap,Nessus等工具!你在这里不需要它们。是的,你听到了!对于黑客攻击JBoss服务器,您不需要太多应用程序。您只需要一个JSP shell和一个浏览器。
我们组建了一个 Google dork来搜索jmx控制台:
inurl:jmx-console/HtmlAdaptorintitle:”jboss management console”“application server” version inurl:”web-console”intitle:”JBoss Management Console – Server Information”“application server” inurl:”web-console” OR inurl:”jmx-console”这是结果,
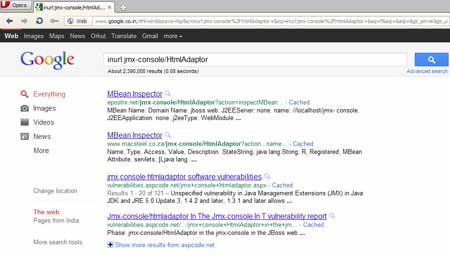
大多数JBoss服务器都对jmx-console进行了默认身份验证。JBoss的默认配置不限制对控制台和Web管理界面的访问,这允许远程攻击者绕过身份验证并通过直接请求获得管理访问权限。
我们只选择其中一个随机URL和宾果游戏!我们可以访问jmx-console。接下来,我们需要一个JSP Shell。通过互联网搜索可以很容易地获得Jsp shell。所以现在,我们有一个JSP shell继续前进。
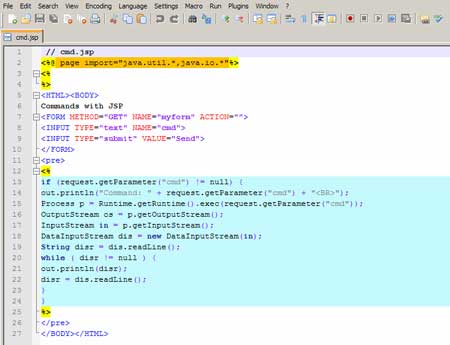
为了部署我们的shell,我们将通过在shell中添加一个新URL来使用jmx控制台中的 DeploymentScanner。使用addURL()命令,可以使用应用程序或shell添加新URL。Jboss将从此URL获取应用程序。
下一步是等待DeploymentScanner部署文件,然后我们将访问我们的shell。我们将shell上传到一个站点,比方说 **:abc.com/attack/cmd.jsp ** ,接下来我们需要部署它。因此,我们将在控制台中访问DeploymentScanner。
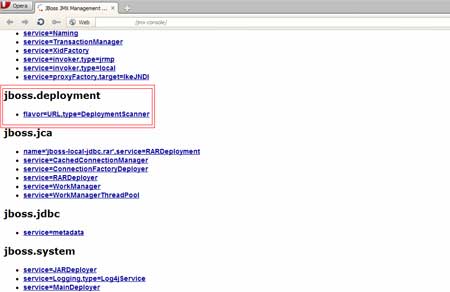
接下来,我们将在jmx-console中添加带有shell的URL 。
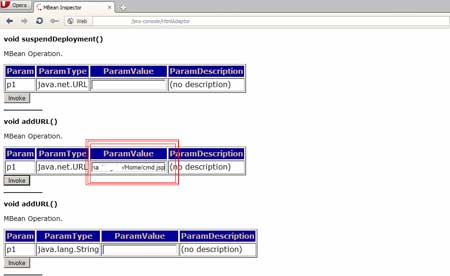
添加URL后,我们将调用该函数。如上图所示,我们有一个按钮来调用该函数。完成后,应用程序会给出成功操作的消息。
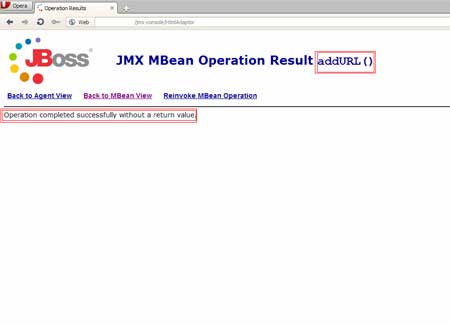
在服务器上部署shell时我们等了一会儿。之后,我们访问了已部署的shell。W00t W00t!我们的shell 在服务器上完美运行!
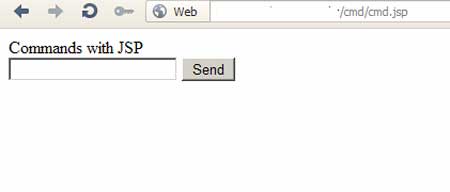
什么惊讶我们的是,我们有一个 root权限使用我们的外壳在服务器

Jboss利用(二)
大多数JBoss服务器都对jmx-console进行了默认身份验证,所以我们用默认身份来登录。 首先我们找到主页面上的
Admin console模块 试试默认账户密码admin。
 成功登录到后台。选择
web appliction archive 上传大马.war文件。把写好的shell.jsp压缩成zip文件,再直接改扩展名.war,就生成好我们的shell.war了,然后直接上传shell.war文件。

最后访问我们的shell
http://url/shell/shell.jsp结论
JBoss默认身份验证漏洞就像 攻击者的圣诞礼物!通常管理员会掉以轻心。但后果可能是致命的。攻击者可以使用此错误成功控制服务器
- 根服务器或隧道它
- 获取敏感信息
- 使用服务器部署恶意软件
- 在网络犯罪活动中使用服务器使用服务器托管恶意内容
- 妥协连接到服务器的其他计算机
而且可能会继续下去!
帽子管理员需要做什么?
- 应尽量避免并应关闭远程访问
- 如果启用了远程访问,
而且可能会继续下去!
帽子管理员需要做什么?
- 应尽量避免并应关闭远程访问
- 如果启用了远程访问,则应应用强密码
- 小小的警告可以保存您组织的关键数据并确保其安全。
下载
参考
-
HackTool
- 一 、子域扫描仪或枚举工具
- 二、数据库漏洞扫描器或枚举工具
- 三、弱密码/用户扫描器或枚举工具
- 四、物联网探测工具或扫描仪
- 五、反射或基于DOM的xss扫描仪
- 六、企业资产管理或泄漏收集工具
- 七、webshell检测或恶意软件分析工具
- 八、内联网渗透工具或扫描仪
- 九、中间件扫描仪或指纹工具
- 十、特殊扫描仪(仅用于某些特殊组件)
- 十一、无线网络扫描器
- 十二、局域网(局域网)扫描器
- 十三、代码检查工具或扫描器
- 十四、模块化设计扫描仪或漏洞检测框架
- 十五、一些工具与APT有关。
- 十六、一些工具与ICS相关。
扫描器是来自GitHub平台的开源扫描器的集合,包括子域枚举、数据库漏洞扫描器、弱密码或信息泄漏扫描器、端口扫描器、指纹扫描器以及其他大规模扫描仪、模块扫描器等。对于其他著名的扫描工具,如:awvs、nmap,w3af将不包含在集合范围内。
一 、子域扫描仪或枚举工具
· https://github.com/lijiejie/subDomainsBrute(由lijiejie提供的一个经典子域枚举工具)
· https://github.com/ring04h/wydomain(用ringzero进行速度和精度子域枚举工具)
· https://github.com/le4f/dnsmaper(带有地图记录的子域枚举工具)
· https://github.com/0xbug/orangescan(联机子域枚举工具)
· https://github.com/TheRook/subbrute(dns元查询蜘蛛,枚举dns记录,以及子域,支持api)
· https://github.com/We5ter/GSDF(通过google证书透明度进行子域枚举)
· https://github.com/mandatoryprogrammer/cloudflare_enum(通过CloudFlare进行子域枚举)
· https://github.com/guelfoweb/knock(敲门子域扫描)
· https://github.com/exp-db/PythonPool/tree/master/Tools/DomainSeeker(IntergrodPython子域枚举工具)
· https://github.com/code-scan/BroDomain(找兄弟域)
· https://github.com/chuhades/dnsbrute(快速域野蛮工具)
· https://github.com/yanxiu0614/subdomain3(一个简单而快速的子域生成工具)
· https://github.com/michenriksen/aquatone(强大的子域工具和域收购查找工具)
· https://github.com/evilsocket/dnssearch(子域枚举工具)
· https://github.com/reconned/domained(用于bug搜索的子域枚举工具)
· https://github.com/bit4woo/Teemo(域名和电子邮件地址收集工具)
· https://github.com/laramies/theHarvester(电子邮件、子域名和人名收割机)
· https://github.com/swisskyrepo/Subdomino(一个枚举子域的应用程序,并用几个规则扫描它们)
· https://github.com/nmalcolm/Inventus(蜘蛛)通过爬行来寻找特定领域的子域
· https://github.com/aboul3la/Sublist3r(用于渗透测试人员的快速子域枚举工具)
· https://github.com/jonluca/Anubis(子域枚举和信息收集工具)
· https://github.com/n4xh4ck5/N4xD0rk(列出关于主域的子域)
· https://github.com/infosec-au/altdns(通过修改和排列发现子域)
二、数据库漏洞扫描器或枚举工具
· https://github.com/0xbug/SQLiScanner(通过sqlmap和charles进行的一个基于漏洞的漏洞扫描)
· https://github.com/stamparm/DSSS(SQLi漏洞扫描器有99行代码)
· https://github.com/LoRexxar/Feigong(用于MySQL的SQLi漏洞扫描器)
· https://github.com/youngyangyang04/NoSQLAttack(用于mongodb的一个基于漏洞的漏洞扫描)
· https://github.com/Neohapsis/bbqsql(一种盲的低密度漏洞扫描器)
· https://github.com/NetSPI/PowerUpSQL(一个带Powershell脚本的SQLi漏洞扫描程序)
· https://github.com/WhitewidowScanner/whitewidow(另一个SQL漏洞扫描器)
· https://github.com/stampery/mongoaudit(强大的mongodb审核和pentesting工具)
· https://github.com/torque59/Nosql-Exploitation-Framework(用于计算机辅助扫描和开发的python框架)
· https://github.com/missDronio/blindy(简单脚本来自动实现盲sql注入漏洞)
· https://github.com/fengxuangit/Fox-scan(一个主动和被动sql注入易受攻击测试工具)
· https://github.com/NetSPI/PowerUpSQL(攻击SQLServer的PowerShell工具包)
· https://github.com/JohnTroony/Blisqy(利用HTTPHeader中基于时间的盲SQL注入)
· https://github.com/ron190/jsql-injection(用于从远程服务器查找数据库信息的轻量级应用程序)
· https://github.com/Hadesy2k/sqliv(大规模sql注入漏洞扫描器)
· https://github.com/UltimateHackers/sqlmate(sqlmap的一个朋友,它将做您一直期望的sqlmap)
· https://github.com/m8r0wn/enumdb(MySQL和MSSQL蛮力和开发后工具)
三、弱密码/用户扫描器或枚举工具
· https://github.com/lijiejie/htpwdScan(pythonHTTP弱传递扫描器)
· https://github.com/ysrc/F-Scrack(单文件蛮力支持多协议)
· https://github.com/Mebus/cupp(普通用户密码分析器)
· https://github.com/netxfly/crack_ssh(SSH\redis\MongoDB弱密码强者)
· https://github.com/LandGrey/pydictor(一个有用的黑客词典生成器,用于暴力攻击)
· https://github.com/shengqi158/weak_password_detect(pythonHTTP弱密码扫描器)
· https://github.com/UltimateHackers/Blazy(Blaz是一个现代的登录强人,它还测试CSRF、Clickjacking、Cloudflare和WAF)
· https://github.com/MooseDojo/myBFF(web应用程序蛮力框架,支持Citrix网关、CiscoVPN等)
四、物联网探测工具或扫描仪
· https://github.com/rapid7/IoTSeeker(弱密码物联网设备扫描器)
· https://github.com/shodan-labs/iotdb(物联网设备扫描仪通过nmap)
· https://github.com/googleinurl/RouterHunterBR(测试连接到Internet的设备和路由器的漏洞)
· https://github.com/scu-igroup/telnet-scanner(基于密码枚举的弱telnet密码扫描器)
· https://github.com/viraintel/OWASP-Nettacker(网络信息收集漏洞扫描器,最适合扫描物联网)
五、反射或基于DOM的xss扫描仪
· https://github.com/shawarkhanethicalhacker/BruteXSS(跨站点脚本编程)
· https://github.com/1N3/XSSTracer(用于检查跨站点跟踪的小型python脚本)
· https://github.com/0x584A/fuzzXssPHP(一个非常简单的反射XSS扫描仪支持GET/POST)
· https://github.com/chuhades/xss_scan(反射xss扫描器)
· https://github.com/BlackHole1/autoFindXssAndCsrf(浏览器的插件,它自动检查页面是否具有xss和漏洞)
· https://github.com/shogunlab/shuriken(xss命令行工具用于测试web应用程序中xss负载列表)
· https://github.com/UltimateHackers/XSStrike(用于XSS、WAF检测和旁路的模糊和蛮力参数)
· https://github.com/stamparm/DSXS(一个完全功能的跨站点脚本漏洞扫描器,支持获取和发布参数,并写入100行代码)
六、企业资产管理或泄漏收集工具
· https://github.com/ysrc/xunfeng(脆弱性快速响应、内联网扫描系统)
· https://github.com/laramies/theHarvester(电子邮件、子域名和人名收割机)
· https://github.com/x0day/Multisearch-v2(基于搜索引擎的企业资产收集器)
· https://github.com/Ekultek/Zeus-Scanner(一种高级的DOCK搜索工具,能够找到被搜索引擎阻塞的IP地址/URL,并且可以在URL上运行sqlmap和nmap扫描)
· https://github.com/0xbug/Biu-framework(基于企业内联网服务的安全扫描框架)
· https://github.com/metac0rtex/GitHarvester(用于从GitHub获取信息)
· https://github.com/shengqi158/svnhack(A).svn文件夹泄露漏洞)
· https://github.com/repoog/GitPrey(在GitHub中搜索敏感文件和内容)
· https://github.com/0xbug/Hawkeye(GitHub泄漏扫描企业)
· https://github.com/lianfeng30/githubscan(企业GitHub泄漏扫描)
· https://github.com/UnkL4b/GitMiner(高级搜索工具和Gizub的自动化)
· https://github.com/lijiejie/GitHack(A).git文件夹泄露漏洞)
· https://github.com/dxa4481/truffleHog(通过git存储库搜索高熵字符串)
· https://github.com/1N3/Goohak(自动启动针对目标域的Google黑客查询)
· https://github.com/UKHomeOffice/repo-security-scanner(发现意外提交给gitrepo的秘密的cli工具,如密码、私钥)
· https://github.com/FeeiCN/GSIL(GitHub敏感信息泄漏)
· https://github.com/MiSecurity/x-patrol(GitHub泄密巡逻)
· https://github.com/1N3/BlackWidow(在目标网站上收集OSINT和Fuzz的OWASP漏洞)
七、webshell检测或恶意软件分析工具
· https://github.com/ym2011/ScanBackdoor(简易webshell探测器)
· https://github.com/yassineaddi/BackdoorMan(一个工具包在选定的目的地中找到恶意、隐藏和可疑的php脚本和shell)
· https://github.com/he1m4n6a/findWebshell(简易webshell探测器)
· https://github.com/Tencent/HaboMalHunter(用于Linux系统上的自动恶意软件分析和安全性评估)
· https://github.com/PlagueScanner/PlagueScanner(开放源码多AV扫描仪框架)
· https://github.com/nbs-system/php-malware-finder(一个用于检测潜在恶意php文件的可怕工具)
· https://github.com/emposha/PHP-Shell-Detector(帮助您查找并识别php/cgi(Perl)/asp/ASPX shell)
· https://github.com/erevus-cn/scan_webshell(简易webshell探测器)
· https://github.com/emposha/Shell-Detector(一个帮助您查找和识别php/perl/asp/ASPX shell的应用程序)
· https://github.com/m4rco-/dorothy2(用Ruby编写的恶意软件/僵尸网络分析框架)
· https://github.com/droidefense/engine(改进Android恶意软件分析框架)
八、内联网渗透工具或扫描仪
· https://github.com/0xwindows/VulScritp(内联网渗透测试脚本)
· https://github.com/lcatro/network_backdoor_scanner(内部网络扫描器,如计量器)
· https://github.com/fdiskyou/hunter(用户猎人只使用WinAPI调用)
· https://github.com/BlackHole1/WebRtcXSS(使用XSS自动化入侵Intranet)
九、中间件扫描仪或指纹工具
· https://github.com/ring04h/wyportmap(目标端口扫描+系统服务指纹识别)
· https://github.com/ring04h/weakfilescan(动态多线程敏感信息泄漏检测工具)
· https://github.com/EnableSecurity/wafw00f(标识和指纹web应用防火墙)
· https://github.com/rbsec/sslscan(测试ssl/tls启用服务,以发现支持密码套件)
· https://github.com/urbanadventurer/whatweb(网站FingerPrint)
· https://github.com/tanjiti/FingerPrint(另一个网站FingerPrint)
· https://github.com/nanshihui/Scan-T(一种基于python的新蜘蛛,具有更多的功能,包括网络指纹搜索)
· https://github.com/OffensivePython/Nscan(快速互联网扫描)
· https://github.com/ywolf/F-NAScan(扫描网络资产信息脚本)
· https://github.com/ywolf/F-MiddlewareScan(中间件服务的漏洞检测脚本)
· https://github.com/maurosoria/dirsearch(网络路径扫描器)
· https://github.com/x0day/bannerscan(C段横幅带路径扫描器)
· https://github.com/RASSec/RASscan(内部网络端口速度扫描器)
· https://github.com/3xp10it/bypass_waf(自动waf旁路工具)
· https://github.com/3xp10it/xcdn(试图找出cdn背后的实际ip)
· https://github.com/Xyntax/BingC(基于Bing搜索引擎C/Side-Stop查询,多线程,支持API)
· https://github.com/Xyntax/DirBrute(多线程web目录枚举工具)
· https://github.com/zer0h/httpscan(来自ip/cidr的爬虫类的http服务检测器)
· https://github.com/lietdai/doom(基于刺的ip端口脆弱性扫描器分布式任务分配)
· https://github.com/chichou/grab.js(快速tcp横幅抓取像zgrab,但支持更多协议)
· https://github.com/Nitr4x/whichCDN(检测给定网站是否受到内容传递网络的保护)
· https://github.com/secfree/bcrpscan(基于爬虫结果的网页路径扫描器)
· https://github.com/mozilla/ssh_scan(SSH配置和策略扫描器原型)
· https://github.com/18F/domain-scan(扫描域上的数据,它们的https配置和其他事物)
· https://github.com/ggusoft/inforfinder(一种用于收集指向服务器和指纹打印机的任何域信息的工具)
· https://github.com/boy-hack/gwhatweb(用于CMS的指纹打印机)
· https://github.com/Mosuan/FileScan(敏感文件扫描器)
· https://github.com/Xyntax/FileSensor(基于爬虫的动态文件检测工具)
· https://github.com/deibit/cansina(Web内容发现工具)
· https://github.com/0xbug/Howl(网络设备、网络服务、指纹扫描仪和数据库)
· https://github.com/mozilla/cipherscan(一种非常简单的方法,可以找出目标支持哪些SSL加密套件)
· https://github.com/xmendez/wfuzz(Web应用程序模糊/框架和Web内容扫描器)
· https://github.com/UltimateHackers/Breacher(用python编写的高级多线程管理面板查找程序)
· https://github.com/ztgrace/changeme(默认的凭据扫描器)
· https://github.com/medbenali/CyberScan(一种开放源码渗透测试工具,可以分析数据包、解码、扫描端口、敲击和定位IP)
· https://github.com/m0nad/HellRaiser(用nmap进行螺旋扫描,然后将cpe的cpe与cve搜索关联起来,以枚举漏洞)
· https://github.com/scipag/vulscan(用Nmap nse进行高级脆弱性扫描)
· https://github.com/jekyc/wig(Webapp Information Gatherer)
· https://github.com/eldraco/domain_analyzer(通过查找所有可能的信息来分析任何域的安全性)
· https://github.com/cloudtracer/paskto(基于nikto数据库的被动目录扫描和web爬虫)
· https://github.com/zerokeeper/WebEye(一个web服务和waf fingerprinter)
· https://github.com/m3liot/shcheck(只需检查目标网站上的安全标头)
· https://github.com/aipengjie/sensitivefilescan(一个速度快、非常棒的敏感文件扫描仪)
· https://github.com/fnk0c/cangibrina(快速而又高精度的仪表板(管理)查找器)
· https://github.com/n4xh4ck5/CMSsc4n(用于识别域是否为CMS的工具,如Wordpress、Moodle、Joomla)
· https://github.com/Ekultek/WhatWaf(检测和绕过web应用防火墙和保护系统)
· https://github.com/dzonerzy/goWAPT(转web应用程序渗透测试和web应用程序模糊工具)
· https://github.com/blackye/webdirdig(敏感文件扫描器)
十、特殊扫描仪(仅用于某些特殊组件)
· https://github.com/blackye/Jenkins(Jenkins漏洞检测,用户抓取枚举)
· https://github.com/code-scan/dzscan(盘式扫描器)
· https://github.com/chuhades/CMS-Exploit-Framework(CMS开发框架)
· https://github.com/lijiejie/IIS_shortname_Scanner(IIS短名扫描仪)
· https://github.com/riusksk/FlashScanner(闪光灯XSS扫描器)
· https://github.com/coffeehb/SSTIF(服务器端模板注入工具)
· https://github.com/epinna/tplmap(自动服务器端模板注入检测和开发工具)
· https://github.com/cr0hn/dockerscan(码头安全分析及黑客工具)
· https://github.com/m4ll0k/WPSeku(简单的Wordpress安全扫描器)
· https://github.com/rastating/wordpress-exploit-framework(用于开发和使用支持wordpress功能网站和系统渗透测试模块的ruby框架)
· https://github.com/ilmila/J2EEScan(为Burp Suite Proxy提供插件,以提高在J2EE应用程序上进行Web应用程序渗透测试时的测试覆盖率)
· https://github.com/riusksk/StrutScan(Struts2.vuls.扫描仪基perl脚本)
· https://github.com/D35m0nd142/LFISuite(全自动LFI开发扫描仪支持反壳)
· https://github.com/0x4D31/salt-scanner(基于盐开放和基于Vulners的审计api的linux漏洞扫描器,具有松弛通知和JIRA集成)
· https://github.com/tijme/angularjs-csti-scanner(用于AngularJS的自动客户端模板注入检测)
· https://github.com/irsdl/IIS-ShortName-Scanner(iis短文件名8.3的扫描器泄漏漏洞)
· https://github.com/swisskyrepo/Wordpresscan(WPScan在python+中重写了一些WPSeku的想法)
· https://github.com/CHYbeta/cmsPoc(CMS开发框架)
· https://github.com/rudSarkar/crlf-injector(自动喷射喷射器)
· https://github.com/3gstudent/Smbtouch-Scanner(自动扫描内部网络以检测它们是否易受攻击)
· https://github.com/utiso/dorkbot(命令行工具扫描google搜索结果以获取漏洞)
· https://github.com/OsandaMalith/LFiFreak(一个独特的自动LFI开发器,带有BIND/反向shell)
· https://github.com/mak-/parameth(这个工具可以用来野蛮地发现GET和POST参数)
· https://github.com/Lucifer1993/struts-scan(Struts 2外阴扫描仪,支持所有的外阴)
· https://github.com/hahwul/a2sv(自动扫描SSL漏洞,如心脏出血等)
· https://github.com/NullArray/DorkNet(Selenium支持Python脚本,用于自动搜索易受攻击的Web应用程序)
· https://github.com/NickstaDB/BaRMIe(java rmi枚举和攻击工具)
· https://github.com/RetireJS/grunt-retire(扫描器检测使用具有已知漏洞的JavaScript库)
· https://github.com/kotobukki/BDA(Hadoop和SPark的漏洞检测器)
· https://github.com/jagracey/Regex-DoS(RegEx拒绝服务扫描器)
· https://github.com/milesrichardson/docker-onion-nmap(使用Tor、ProxyChains和dnsmasq用nmap扫描洋葱隐藏服务)
· https://github.com/Moham3dRiahi/XAttacker(WebCMS利用框架)
· https://github.com/lijiejie/BBScan(一个小型批处理Web漏洞扫描器)
· https://github.com/almandin/fuxploider(文件上传漏洞扫描器和利用工具)
十一、无线网络扫描器
· https://github.com/savio-code/fern-wifi-cracker/(测试和发现自己网络中的缺陷)
· https://github.com/m4n3dw0lf/PytheM(多用途网络五层框架)
· https://github.com/P0cL4bs/WiFi-Pumpkin(盗用Wi-Fi接入点攻击框架)
· https://github.com/MisterBianco/BoopSuite(用Python编写的用于无线审计和安全测试的工具套件)
· https://github.com/DanMcInerney/LANs.py(自动找到最活跃的WLAN用户,注入代码,阻塞wifi,并监视wifi用户)
· https://github.com/besimaltnok/PiFinger(搜索wifi-菠萝痕迹并计算无线网络安全分数)
· https://github.com/derv82/wifite2(自动无线攻击工具的完整重新编写)
十二、局域网(局域网)扫描器
· https://github.com/sowish/LNScan(基于BBScan via.lijieje的本地网络扫描仪)
· https://github.com/niloofarkheirkhah/nili(网络扫描工具,中间人,协议逆向工程和模糊)
· https://github.com/SkyLined/LocalNetworkScanner(当您打开网页时扫描本地网络的poc javascript)
· https://github.com/rootlabs/nWatch(局域网中主机发现、端口扫描和操作系统指纹识别工具)
十三、代码检查工具或扫描器
· https://github.com/wufeifei/cobra(一个自动代码分析系统,用于自动检测漏洞和安全问题)
· https://github.com/OneSourceCat/phpvulhunter(可以使用静态分析方法自动扫描php漏洞的工具)
· https://github.com/Qihoo360/phptrace(用于php脚本的跟踪和故障排除工具)
· https://github.com/ajinabraham/NodeJsScan(用于电子邮件应用程序的静态安全代码扫描器)
· https://github.com/shengqi158/pyvulhunter(用于python应用程序的静态安全代码扫描器)
· https://github.com/presidentbeef/brakeman(用于RubyonRails应用程序的静态分析安全漏洞扫描器)
· https://github.com/python-security/pyt(用于检测PythonWeb应用程序中的安全漏洞的静态分析工具)
· https://github.com/m4ll0k/WPSploit(WordPress插件代码审核)
· https://github.com/emanuil/php-reaper(用于扫描ADOdb代码以进行SQL注入的PHP工具)
· https://github.com/lowjoel/phortress(PHP静态代码分析器,用来分析潜在的漏洞)
十四、模块化设计扫描仪或漏洞检测框架
· https://github.com/infobyte/faraday(协作渗透测试和漏洞管理平台)
· https://github.com/az0ne/AZScanner(自动全方位扫描仪)
· https://github.com/blackye/lalascan(分布式Web漏洞扫描框架)
· https://github.com/blackye/BkScanner(分布式、插件web漏洞扫描器)
· https://github.com/ysrc/GourdScanV2(被动漏洞扫描系统)
· https://github.com/netxfly/passive_scan基于http代理的web漏洞扫描系统实现
· https://github.com/1N3/Sn1per(自动五旬节侦察扫描仪)
· https://github.com/RASSec/pentestEr_Fully-automatic-scanner(定向完全自动渗透测试)
· https://github.com/3xp10it/3xp10it(自动渗透测试框架)
· https://github.com/Lcys/lcyscan(一个插件扫描器,插件支持)
· https://github.com/Xyntax/POC-T(穿透测试插件并发框架)
· https://github.com/v3n0m-Scanner/V3n0M-Scanner(用于SQLi/xss/LFI/rfi和其他Vulns的扫描程序中的扫描器)
· https://github.com/Skycrab/leakScan(多个外阴扫描支持Web接口)
· https://github.com/zhangzhenfeng/AnyScan(自动渗透测试框架)
· https://github.com/Tuhinshubhra/RED_HAWK(一个用于收集信息、SQL漏洞扫描和爬行的全部集成工具。(用PHP编码)
· https://github.com/Arachni/arachni(Web应用程序安全扫描框架)
· https://github.com/boy-hack/w8scan(类似于Bugscan的扫描仪)
· https://github.com/juansacco/exploitpack(利用Pack-渗透测试框架GPLv 3)
· https://github.com/swisskyrepo/DamnWebScanner(另一个Web漏洞扫描器,此扩展在Chrome和Opera上工作)
· https://github.com/anilbaranyelken/tulpar(用python编写的web漏洞扫描程序,支持多个web漏洞扫描)
· https://github.com/m4ll0k/Spaghetti(一个Web应用程序安全扫描工具,旨在查找各种默认和不安全的文件、配置和错误配置)
· https://github.com/Yukinoshita47/Yuki-Chan-The-Auto-Pentest(一个自动渗透测试工具-该工具将为您审核所有标准的安全测试方法)
· https://github.com/0xsauby/yasuo(在网络上扫描易受攻击和可利用的第三方web应用程序的Ruby脚本)
· https://github.com/hatRiot/clusterd(应用服务器攻击工具包)
· https://github.com/erevus-cn/pocscan(开放源码和分布式web漏洞扫描框架)
· https://github.com/TophantTechnology/osprey(分布式Web漏洞扫描框架)
· https://github.com/yangbh/Hammer(web漏洞扫描器框架)
· https://github.com/Lucifer1993/AngelSword(基于上的web漏洞扫描框架)
· https://github.com/secrary/EllaScanner(被动Web扫描程序,您可以获得与服务器版本相关的CVEs)
· https://github.com/zaproxy/zaproxy(世界上最受欢迎的免费安全工具之一,由数百名国际志愿人员积极维护)
· https://github.com/sullo/nikto(nikto是一个web服务器评估工具)。它旨在查找各种默认的和不安全的文件、配置和程序,无论是哪种web服务器都是这样的。
· https://github.com/UltimateHackers/Striker(前锋是一种攻击性信息和漏洞扫描器)
· https://github.com/dermotblair/webvulscan(用php编写并可以用于测试远程或本地web应用程序以获得安全漏洞)
· https://github.com/alienwithin/OWASP-mth3l3m3nt-framework(渗透测试辅助工具和开发框架)
· https://github.com/toyakula/luna(基于减少代码被动扫描框架的开源web安全扫描器)
· https://github.com/Manisso/fsociety(渗透测试框架,包括信息收集、无线测试、网络黑客等)
十五、一些工具与APT有关。
· https://github.com/Neo23x0/Loki(简单国际奥委会和事件反应扫描仪)
十六、一些工具与ICS相关。
· https://github.com/w3h/icsmaster/tree/master/nse(数字债券的ICS枚举工具)
-
Ajax学习笔记
AJAX:Asynchronous Javascript And XML.
AJAX不是新的编程语言,而是一种使用现有标准的新技术。AJAX是在不重新加载整个页面的情况下,与服务器交换数据并异步更新部分网页的艺术。
一、传统javascript使用ajax方式:
XMLHttpRequest对象:所有现代浏览器均支持XMLHttpRequest对象,XMLHttpRequest用于在后台与服务器交换数据。
1)生成XMLHttpRequest对象:
<script type="text/javascript" >
        function CreateXMLHTTP() {
            var objXmlHttp;
            // 检测MSXMLHTTP版本,为了兼容IE各个版本
            var activeKey = new Array("MSXML2.XMLHTTP.5.0", "MSXML2.XMLHTTP.4.0", "MSXML2.XMLHTTP.3.0", "MSXML2.XMLHTTP", "Microsoft.XMLHTTP");
            if (window.ActiveXObject) {
                for (var i = 0; i < activeKey.length; i++) {
                    try {
                        objXmlHttp = new ActiveXObject(activeKey[i]);
                        if (objXmlHttp != null)
                            return objXmlHttp;
                    }
                    catch (error) {
                        throw new Error("您的浏览器版本过低,请更新浏览器");
                    }
                }
            }
            else if (window.XMLHttpRequest) {
                objXmlHttp = new XMLHttpRequest();
            }
            return objXmlHttp;
        }
    </script>
2)XMLHttpRequest对象向服务器发送请求:
objXmlHttp.open(method,url,async); objXmlHttp.send();method:请求的类型有GET或者POST; url:文件在服务器上的位置; async:true(异步)或false(同步).
使用GET还是POST?
与post相比,get更简单也更快,并且在大部分情况下都能用。然而,在以下情况中,请使用post请求:
- 无法使用缓存文件(更新服务器上的文件或数据库)。
- 向服务器发送大量数据(post没有数据量的限制)。
- 发送包含未知字符的用户输入时,post比get更稳定可靠。
3)服务器响应:
如需获得来自服务器的响应,使用XMLHttpRequest对象的responseText或responseXML属性。
例如:
document.getElementById("myDiv").innerHTML=xmlhttp.responseText;

xmlDoc=xmlhttp.responseXML;
txt="";
x=xmlDoc.getElementsByTagName("ARTIST");
for (i=0;i<x.length;i++)
  {
  txt=txt + x[i].childNodes[0].nodeValue + "<br />";
  }
document.getElementById("myDiv").innerHTML=txt;
4)客户端响应事件onreadystatechange
XMLHttpRequest对象的三个重要属性:
onreadystatechange:存储函数(或函数名),每当readystate属性改变时,就会调用该函数。
readystate:有5个状态,0:请求未初始化,1:服务器连接已建立,2:请求已接收,3:请求处理中,4:请求已完成,且响应已就绪。
status:有200:“OK”,404:未找到页面。
跟进javascript使用ajax的步骤编写一具体实例:
<script type="text/javascript" >
        function GetSendData() {
            document.getElementById("divTip").innerHTML = "正在加载中";
            var strSendUrl = "b.html?date=" + Date();
            CreateXMLHTTP();
            objXmlHttp.open("GET", strSendUrl, true);
            objXmlHttp.onreadystatechange = function () {
                if (objXmlHttp.readyState == 4) {
                    if (objXmlHttp.status == 200) {
                        document.getElementById("divTip").innerHTML = objXmlHttp.responseText;
                    }
                }
            }

            objXmlHttp.send(null);
        }
    </script>
二、ajax 一般流程总结
<script>
//1.创建一个XMLHttpRequest类型的对象—相当于打开了一个浏览器
var xmlhttp;
if (window.XMLHttpRequest)
  {// code for IE7+, Firefox, Chrome, Opera, Safari
  xmlhttp=new XMLHttpRequest();
  }
else
  {// code for IE6, IE5
  xmlhttp=new ActiveXObject("Microsoft.XMLHTTP");
  }
//2.打开与一个网址之间的连接—相当于在地址栏输入访问地址
xmlhttp.open('GET','./time.php')
//3.通过连接送一次请求—相当于回车或者点击访问发送请求
xmlhttp.send(nul1)
//4.指定xmlhttp状态变化事件处理函数—相当于处理网页呈现后的操作
xmlhttp.bnreadystatechange=function(){
//通过xmlhttp的readyState判断此次请求的响应是否接收完成
if(this.readyState ===4){
//通过xmlhttp的responseText获取到响应的响应体
console.log(this)
</script>
-
debian下执行定时任务及问题解决
一、安装crond
apt-get install cron二、配置文件
1.常用的cron命令:
/etc/init.d/crond start   //启动
/etc/init.d/crond stop    //关闭
/etc/init.d/crond restart //重启
有的系统可能init.d目录下没有crond,只有cron,其实也一样,只不过把crond换为cron:
/etc/init.d/cron start   //启动
/etc/init.d/cron stop    //关闭
/etc/init.d/cron restart //重启
判断crond 是否在运行:
pgrep crond或者pgrep cron,如果有在运行则返回进程号。 杀掉crond进程:pkill crond或者pkill cron,此法可用在关闭或重启不了cron的时候。 配置cron定时任务:crontab -e,配置文件路径一般为/var/spool/cron/crontabs/root这个是root用户的配置文件,其它用户是对应的用户名命名的文件,所以配置定时任务也可以vi /var/spool/cron/crontabs/root进入编辑。 crontab -u<用户名称> 查看配置文件:crontab –l2.下面讲如何配置定时任务
基本格式 :
* * * * * command几个星号分别为:分 时 日 月 周,最后是要执行的命令。 分:0~59 时:0~23 日:1~31 月:1~12 周:0~6(0表示星期天) 配置文件的一些例子:0 3 * * * /root/test.sh 每天凌晨3点执行test.sh文件 * 23-7/1 * * * /root/lnmp restart 晚上11点到早上7点之间,每隔一小时重启lnmp套件 */30 * * * * /usr/sbin/ntpdate 每半小时同步一下时间 0 23 * * 6 /lnmp restart 每星期六的11 : 00 pm重启重启lnmp套件。 * */1 * * * /usr/bin/mutt -s "hello" test@seeke.net </home/content.txt 每隔1小时发送一封电子邮件。3.几个特殊符号的含义
“*”代表取值范围内的数字,
“/”代表”每”,
“-”代表从某个数字到某个数字,
“,”分开几个离散的数字
4.注意事项
很多朋友可能在用cron 的时候会遇到命令不执行的情况。遇到这种情况一般首先是检查cron有没有在运行,如果有在运行在重启一下cron,让它重新加载配置试试,再就是检查配置文件有没有格式错误,如果这些都没有问题,那我就讲下我是怎么处理的,把执行语句调频繁一些比如:
*/1 * * * * /root/test.sh每分钟执行一次测试语句,看看任务有没有执行,如果有被执行,那就是软件,和配置文件都没有问题了,那很可能就是时间对不上的问题了的,比如时区不对,在我的实践中遇到,cron默认好像是按照天文时间来执行的,即使你的服务器时区是配置正确的也这样,不知为何,也可能是个例,比如我的时间是东8区,设定03:00点执行的命令,实际是11:00点执行的,这是也可以变通下,把时间+8设定为19:00,就可以达到03:00执行的目的了。三、出现错误问题:
crontab -e出现:
crontab: "/usr/bin/sensible-editor" exited with status 1解决方法: 输入
select-editr出现Select an editor. To change later, run 'select-editor'. 1. /bin/ed 2. /bin/nano <---- easiest 3. /usr/bin/vim.basic 4. /usr/bin/vim.tiny我们选择3,更改编辑器 Choose 1-4 [2]: 3
-
GitHub Pages域名绑定2018,别被旧文章误导了
1.创建GitHub Pages 如果不知道如何创建GitHub Pages,https://pages.github.com/
2.注册域名 到阿里云或者腾讯云买个自己喜欢的域名(.top域名不能作为腾讯域名邮箱),以下用 example.com 表示你买的域名
3.到项目的设置中添加刚刚买的域名 推荐下面的方式,不要用新建文件方式(新建CNAME文件的方法),免得出错

往下翻输入你自己的域名,比如:example.com,your site is published at….这里先不用管,直接在domain写上你的域名,然后点save就行。

4.域名解析 到域名控制台(阿里云,腾讯云,或者其他域名供应商)找到域名列表点击解析设置,
很多人在这一步出错,或者设置完了但是访问不了(username.github.io 和 example.com 都无法访问)
仅仅添加两个CNAME类型即可,不需要管A类型,或者IP什么的

有的旧教程里面各种ping主机,填IP,统统不需要。
主机记录www和@是为了 www.example.com 和 example.com 都能访问到你的页面
这个时候你会发现还是不能访问,因为在等服务商分配DNS(可能不止10分钟),这样配置准没错,去睡个觉醒来就能访问了
-
Git的使用附常用命令速查表
简单使用git
1 通过git clone xxx.@git 将代码down到本地
2 当你修改或者添加文件的时候
3 首先使用git status 查看文件状态,
4 然后使用git add . 将文件add到本地缓冲区
5 再提交到本地仓库:git commit -m “提交记录内容”
6 最后push到githu上面去:git push origin master
在push到上面去的时候会要求我们的账号跟密码,这时候填入即可,最后会出现一张push成功的图片,然后在github仓库上看一下就能看到我们提交的内容记录了(可以参考上篇文章)[http://www.jianshu.com/p/71fbf000b0e7]
当然了,如果是我们自己的仓库可以不用每次git pull 一下远程仓库 如果团队协作的话,先从远程更新到本地,再本地进行修改,也就是merge操作,最后把修改好的文件按照git add , 等等操作进行文件的上传到github上面去
git pull 获取新版本

git status

git add ...

git commit -m "add new files"

git push -u origin master
Git 常用命令速查表
创建版本库
git clone <url>                  #克隆远程版本库
git init                         #初始化本地版本库
修改和提交
git status                       #查看状态
git diff                         #查看变更内容
git add .                        #跟踪所有改动过的文件
git add <file>                   #跟踪指定的文件
git mv <old><new>                #文件改名
git rm<file>                     #删除文件
git rm --cached<file>            #停止跟踪文件但不删除
git commit -m "commit messages"  #提交所有更新过的文件
git commit --amend               #修改最后一次改动
查看提交历史
git log                    #查看提交历史
git log -p <file>          #查看指定文件的提交历史
git blame <file>           #以列表方式查看指定文件的提交历史
撤销
git reset --hard HEAD      #撤销工作目录中所有未提交文件的修改内容
git checkout HEAD <file>   #撤销指定的未提交文件的修改内容
git revert <commit>        #撤销指定的提交
git log --before="1 days"  #退回到之前1天的版本
##分支与标签
git branch                   #显示所有本地分支
git checkout <branch/tag>    #切换到指定分支和标签
git branch <new-branch>      #创建新分支
git branch -d <branch>       #删除本地分支
git tag                      #列出所有本地标签
git tag <tagname>            #基于最新提交创建标签
git tag -d <tagname>         #删除标签
合并与衍合
git merge <branch>        #合并指定分支到当前分支
git rebase <branch>       #衍合指定分支到当前分支
远程操作
git remote -v                   #查看远程版本库信息
git remote show <remote>        #查看指定远程版本库信息
git remote add <remote> <url>   #添加远程版本库
git fetch <remote>              #从远程库获取代码
git pull <remote> <branch>      #下载代码及快速合并
git push <remote> <branch>      #上传代码及快速合并
git push <remote> :<branch/tag-name>  #删除远程分支或标签
git push --tags                       #上传所有标签